Creamy Red Lentil Rosé with Roasted Red Peppers (Vegan & Nut Free)

This pasta sauce is creamy and comforting while being both nutrient-rich and naturally vegan & gluten-free. Most vegan sauces call for cashews which can be costly. My recipe calls for red lentils which are an excellent source of protein and fibre. The added nutritional yeast delivers a satisfying cheesy taste and is a significant source of the B-complex vitamins.

If you care to, please share your creations of my recipes by using the hashtag #milkandmarigolds or tag your post on Instagram @milkandmarigolds

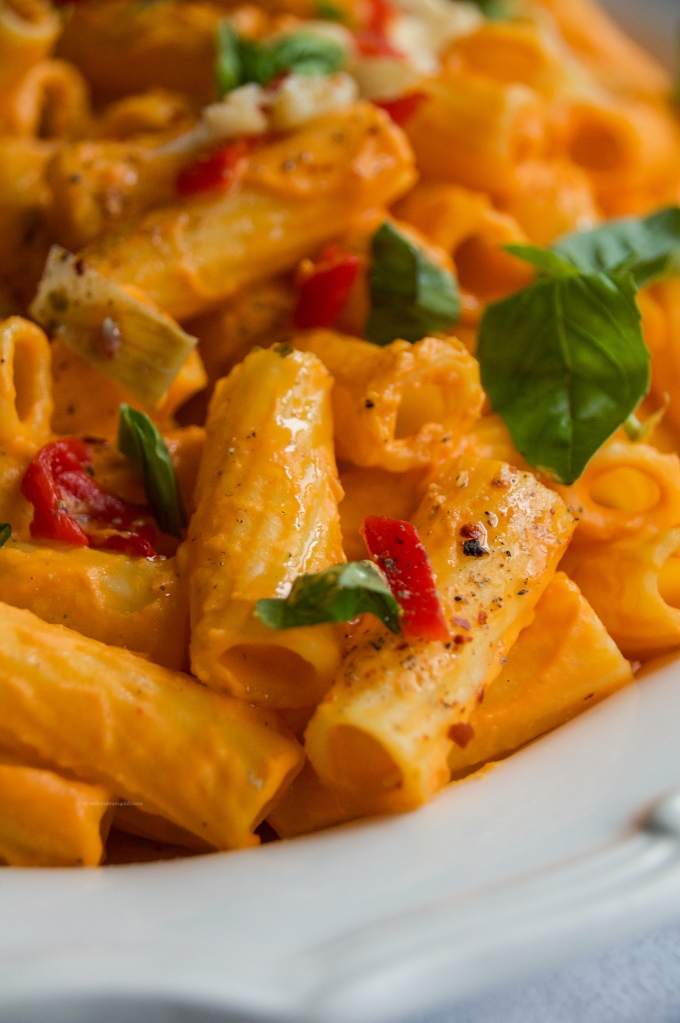
Creamy Red Lentil ‘Rosé’ with Roasted Red Peppers (Vegan & Nut Free)

Author: Milk & Marigolds Yields approx. 3 cups of sauce  

Total Time: 30 – 40 minutes Serves: 4 with the pasta

Equipment: A high speed blender, one small cooking pot and one large pot

Note: The sauce yields enough for 2 separate meals (serving 8 in total). I like to make this batch and freeze half of the sauce for later. If you do not wish to do this, then halve the sauce recipe.

Ingredients:

1/2 cup of dried spilt red lentils

1 small yellow onion, chopped

1 heaping tablespoon of finely minced garlic

2 1/2 tbsp of fresh lemon juice

100 g or 3/4 cup cauliflower

1 full cup of roughly chopped roasted red pepper (I used jarred), plus a 1/4 cup for garnish

3 tbsp nutritional yeast 

2 1/2 tbsp of Extra Virgin Olive Oil

1 Gluten Free stock cube

1 400 mL sized can coconut milk (you will need 1/4 cup plus 1 tbsp of the coconut cream only. This is the coconut fat that sits at the top of canned coconut)

salt & pepper to taste

250 g or 8.8oz of pasta

Garnish:

A small bunch of fresh basil, roughly chopped

roasted red peppers, roughly chopped

jarred artichokes and/or olives your choice

extra virgin olive oil

dried chili flakes

Instructions:

1. Gather all the ingredients and equipment required. Begin by rinsing the lentils with cold water and drain. Add the lentils to a small pot along with 1 1/4 cups of water. Cover and bring to a simmer. The spilt lentils should take about 10 – 15 minutes to cook. Stir occasionally and add a bit more water if needed.

2. Meanwhile, chop the onion and mince the garlic. Also, chop and set aside your garnishes for later. Cut the cauliflower into small chunks and place it in a bowl of water to cook quickly in the microwave or stovetop if preferred. I usually steam it in the microwave for 3-4 minutes. 

3. At this time you may want to prepare your large cooking pot for the pasta. Always salt your water prior to adding the pasta to it. A couple generous pinches will do. Cover the pot and bring the water to a boil. Add the pasta to the boiling water when you are ready. Stir occasionally so the GF pasta noodles don’t stick together.

4. Once the lentils have cooked, scrape them into the blender. Reserve the cooking pot to add the oil and warm it on medium heat. Then, add the onions and sauté until tender. Add the garlic and sauté for a couple more minutes. Lower the heat and add the stock cube along with a pinch of salt and pepper. Scrape the contents into the blender. Also, add the cooked cauliflower, the coconut cream, roasted red peppers, lemon juice and the nutritional yeast. Blend until completely smooth.

5. Strain pasta and then add it back to the pot. Then, pour out about 1 cups worth of sauce into the same pot as the pasta and combine it well. Add more sauce if desired. Generously garnish with fresh basil and roasted red peppers, dried chilies and add more salt and pepper to taste. Drizzle with more extra virgin olive oil and serve while warm. Enjoy!

Copyright 2014 – 2021 © Milk & Marigolds

Simple Pea Pesto

This simple pea pesto pairs beautifully with pasta, is delicious on sandwiches and is great as a pizza sauce base. Frozen peas are a versatile ingredient and contain about 8 grams of protein per cup.

I served this pesto on pasta as I am a pasta lover. My go to brand for gluten-free pasta is @Catellipasta because it tastes just as delicious and flavourful as the real thing.

pea pesto by milkandmarigolds.com pesto with catelli glutenfree pasta

If you care to, please share your creations with me by using the hashtag #milkandmarigolds or tag your post on Instagram @milkandmarigolds

pea pesto

Simple Pea Pesto

Prep Time: 10 minutes     Author: Milk & Marigolds.
Serves: 4 with pasta (easily scalable)

Ingredients:
Catelli Gluten-Free Spaghetti
1 cup peas (I used frozen)
1/2 cup (packed) fresh basil
2 tbsp lime or lemon juice (I used lime)
1/2 small garlic clove, finely grated
1/2 tsp table salt
1/4 cup + 2 tbsp extra virgin olive oil
1 tbsp water
A couple turns of black pepper
Optional: 1/2 tsp chili pepper flakes

Suggested Garnish:
Basil leaves
Parmesan cheese (or vegan alternative)

Equipment:
Measuring cup
Food processor
Fine grater or microplane grater
Kitchen scissors or sharp knife
Spatula

Instructions:
1. Cook the peas (I cook them for 3 minutes in the microwave) and then rinse the peas under cold water. Salt a large pot of water if preparing pasta.

2. Meanwhile, get out your food processor and a fine grater or microplane grater. If you have neither, cut up half a small clove of garlic and mince it as finely as you can.

3. Once the peas have cooled, add them to the food processor along with the grated garlic, salt, pepper and pepper flakes. Do not add the basil, lime/lemon juice, water or the oil as of yet. Pulse until the peas are chopped but still have some texture to them. Use a spatula to scrap the sides of the processor to help evenly distribute the ingredients.

4. Then add in the lime/lemon juice and water and pulse a few more times.

5. Set aside a couple of basil leaves for garish. Roll the remaining basil leaves together and use kitchen scissors to cut the basil up into small pieces directly into the food processor. Pulse a few more times and then slowly add in a little of the olive oil at a time in-between pulses. Pulse until you’ve achieved a desired consistency. I personally prefer mine almost smooth.

6. Use your spatula to scrap out the pesto into a jar or container or use it right away. Mix the pea pesto with pasta, spread it on crusty bread, on a sandwich or use it as a pizza base. Garnish, and salt and pepper from a height.

Note: This pesto contains no dairy, so it freezes well.

Milk & Marigolds © Copyright 2015
pea pesto by milkandmarigolds.com


Salmon Ceviche Sushi Bowl with San J Tamari

Whether you like it raw, well done or something in-between, this recipe is adaptable to your personal taste. Simply add or edit the toppings to make yourself the perfect bowl. I have included a recipe for sushi rice and for salmon ceviche but feel free to grill it, bake it, eat it as is or use a protein alternative.

Salmon Ceviche Sushi Bowl

Ceviche is a prepared combination of citrus, salt and chillies. I also like to add a little San J Tamari. These ingredients are used to cure and ‘cook’ the raw fish without using any heat. The longer you let the fish sit in this acidic dressing, the more cooked it will become. Just let the refrigerator and acid do all the work.

I recommend using frozen salmon and a glass bowl or glass Tupperware to cure the fish in. Avoid using metal bowls as it may leave a metallic taste.

sushi bowl by milkandmarigolds.com

If you care to, please share your creations with me by using the hashtag #milkandmarigolds or tag your post on Instagram @milkandmarigolds

salmon sushi bowl by milkandmarigolds.com

Salmon Ceviche Sushi Bowl

Prep Time: 40 minutes       Waiting Time: 2 + hours/overnight (depending on preference)    Author: Milk & Marigolds    Serves: 2 large (easily scalable)

Rice:
1 cup sushi rice
1 1/2 cups water
2 tbsp rice vinegar
1 tbsp white granulated sugar
1/4 tsp kosher salt (use half if using table salt)

(Optional) Ceviche:
400 g (short of 1 pound) frozen salmon (deboned & skin removed), cut into 1/2 inch cubes
1/4 cup lime juice (2 -3 limes)
1/4 cup lemon juice (about 1 -2 lemons)
zest from one lime
1/2 teaspoon San J Tamari
1/2 tsp kosher salt
1/2 small red onion, very thinly sliced
sprinkle of cayenne

Bowl Ingredients: 
1 avocado, sliced
2 baby cucumbers, sliced based on preference
3/4 cup frozen edamame, steamed
1 carrot, grated
2 radishes, thinly sliced 
1 sheet of roasted seaweed (Nori)
1 tsp roasted sesame seeds
pickled ginger 
San J Tamari (g-free soy sauce) for dipping

Spicy Mayo:
3 tbsp mayo
Sriracha (amount depends on preference. I used 1/2 tbsp)

Equipment:
measuring cup
A large glass bowl or a large glass Tupperware container 
mandolin or a sharp knife
cutting board
fine grater/zester or microplane
fine-mesh strainer for rinsing rice
measuring cup
wooden spoon 
whisk

Instructions:

* * *If you plan to cook your fish or use another protein altogether, then skip steps 1-3 and prepare the rice first * * *

1.Begin by preparing the ceviche. Take your fish out of the freezer and allow it to defrost. If you like your fish medium/rare, then I recommend leaving the fish in the acid bath for about 2 hours. Prefer it well done? Then allow the fish to ‘cook’ in the refrigerator overnight.

2. Into a glass tupperware or glass bowl, zest one lime. Then juice your lemon and limes, San J Tamari, add the salt, cayenne and the thinly-sliced red onion. Mix the ingredients well.

3. Cut the salmon into 1/2 inch (or smaller) cubes. The smaller the cubes, the faster the salmon will cure. Add the salmon into the acid bath and combine. Try to cover all of the fish with the acidic liquid. Cover and place the ceviche in the refrigerator for 1 hour and then mix well again. In the meantime, prepare the rice.

4. Prepare the rice by first rinsing it if time allows. Rinse the rice with cold water and then allow it to drain for 30 minutes before cooking. While the rice is cooking (follow manufacturer’s instructions), whisk the rice vinegar, salt and sugar together and pour it over the rice once it has cooled down a bit. Gently fold the rice with a large wooden spoon a few times to evenly distribute the vinegar mixture. The rice can be covered with a clean kitchen cloth and kept on the counter until you are ready to serve it.

5. While waiting for the rice to cool to room temperature, prepare your bowl toppings. Cook the edamame for a few minutes (I usually steam it for 3-4 minutes in the microwave). Grate the carrot, cut up the seaweed sheets (Nori) into small bite-sized pieces, and prepare your spicy mayo. All these ingredients can be prepared ahead of time and stored in the fridge until you are ready to eat. I recommend waiting to slice the cucumber and avocado until you are ready to serve the meal.

6. Once your ceviche or alternative protein is ready, arrange all desired ingredients on top of the rice. Discard any of the left over ‘acid’ liquid. Garnish the toppings with sesame seeds and enjoy!

Milk & Marigolds © Copyright 2015

Watercress Soup with Cauliflower & Apple

Watercress is a superfood containing over 18 vitamins and minerals and should be eaten shortly after picking for nutritional benefit. While watercress is bitter in taste, it pairs beautifully in this recipe with puréed cauliflower and apple for a savoury-sweet, balanced flavour. 
watercress soup milkandmarigolds.com-4

In many ways, springtime is like New Year. Spring can ignite excitement over the opportunity to start over fresh and to make healthy eating choices. This simple, easy to make watercress soup by Milk and Marigolds is spring inspired and full of freshness and flavour.  This recipe is also free of dairy and gluten.

To find more recipes, visit milkandmarigolds.com or @milkandmarigolds 

Watercress Soup with Cauliflower & Apple

Prep Time: 15 minutes                Cooking Time: 40 minutes 
Author: Milk & Marigolds.          Serves: 2 (easily scalable)             

Ingredients 
1 tbsp (15 mL) extra virgin olive oil
1/2 yellow onion, minced
1 cup (225 mL) cauliflower, roughly chopped
3 tsp of stock bullion powder or 1.5 to 2 cubes (preference)
3 cups (680 mL) water
2 1/2 (560 mL ) packed cups of watercress, stems removed
1 Granny Smith apple, peeled, cored and roughly chopped
1/4 tsp sea salt or pink Himalayan salt
ground pepper to taste

Garnish Suggestions
drizzle of extra virgin olive oil
drizzle of coconut milk
roasted, crispy cauliflower

Equipment
A blender

Instructions

1.  Begin by removing the stems of the watercress. While the stems are edible, they are quite bitter. Throughly wash and drain the watercress. Set aside and reserve a 1/2 cup worth of raw watercress for garnish (refrigerate until it is needed).

2.   Meanwhile, roughly chop the cauliflower and mince the onion. Then peel, core and roughly chop a Granny Smith apple.

3.   In a medium sized pot, set the heat to medium and then add 1 heaping tablespoon of extra virgin olive oil. Add in the onions and lightly sauté for a couple minutes before adding in the chopped cauliflower and apple. Continue to sauté for 10 to 15 minutes or until slightly browned.

4.   Then add the water, stock cubes/powder and salt to the pot. Cover and bring to a light boil for a couple minutes, then simmer on low (while still covered) for 20 minutes or until the cauliflower is tender.  

5.   Meanwhile, chop up the 1/2 cup of watercress for garnish and prepare any other desired garnishes. For more garnish suggestions visit milkandmarigolds.com

6.    Add in the 2 cups of watercress right at the end and blend immediately. Blend until smooth or until desired consistency is achieved. 

7.   Season to taste with salt and pepper. Top with chopped watercress. 

Milk & Marigolds © Copyright 2015

Warm Mushroom Salad with Avocado, Dried Cranberries & Quick-Pickled Red Onions

watercress soup milkandmarigolds.com-3
How are you getting your Vitamin D these days? Did you know that mushrooms are the only natural (non-fortified) plant source of Vitamin D? 

Mushrooms are incredibly versatile and can enrich any meal. If it is challenging to find fresh mushrooms, try ordering dried mushrooms which can be easily rehydrated. This warm mushroom salad is both sweet and savoury and full of nutrients. Let me know if you give it a try and please use @milkandmarigolds or #milkandmarigolds on Instagram to show me how yours turns out! 

Continue reading