Whether you like it raw, well done or something in-between, this recipe is adaptable to your personal taste. Simply add or edit the toppings to make yourself the perfect bowl. I have included a recipe for sushi rice and for salmon ceviche but feel free to grill it, bake it, eat it as is or use a protein alternative.

Ceviche is a prepared combination of citrus, salt and chillies. I also like to add a little San J Tamari. These ingredients are used to cure and ‘cook’ the raw fish without using any heat. The longer you let the fish sit in this acidic dressing, the more cooked it will become. Just let the refrigerator and acid do all the work.
I recommend using frozen salmon and a glass bowl or glass Tupperware to cure the fish in. Avoid using metal bowls as it may leave a metallic taste.

If you care to, please share your creations with me by using the hashtag #milkandmarigolds or tag your post on Instagram @milkandmarigolds

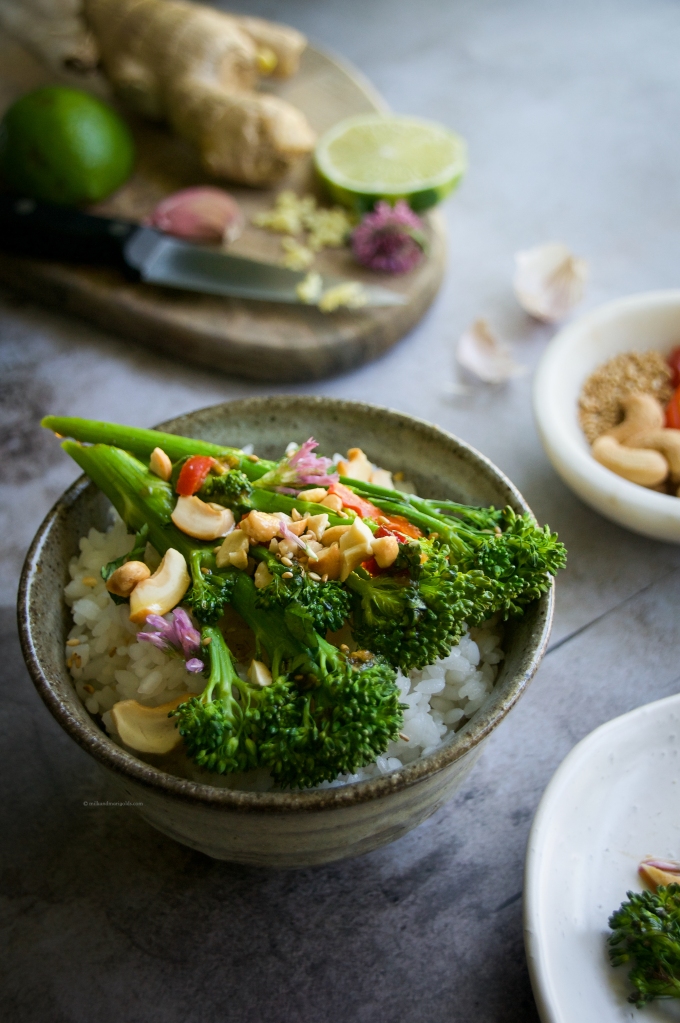
Salmon Ceviche Sushi Bowl
Prep Time: 40 minutes Waiting Time: 2 + hours/overnight (depending on preference) Author: Milk & Marigolds Serves: 2 large (easily scalable)
Rice:
1 cup sushi rice
1 1/2 cups water
2 tbsp rice vinegar
1 tbsp white granulated sugar
1/4 tsp kosher salt (use half if using table salt)
(Optional) Ceviche:
400 g (short of 1 pound) frozen salmon (deboned & skin removed), cut into 1/2 inch cubes
1/4 cup lime juice (2 -3 limes)
1/4 cup lemon juice (about 1 -2 lemons)
zest from one lime
1/2 teaspoon San J Tamari
1/2 tsp kosher salt
1/2 small red onion, very thinly sliced
sprinkle of cayenne
Bowl Ingredients:
1 avocado, sliced
2 baby cucumbers, sliced based on preference
3/4 cup frozen edamame, steamed
1 carrot, grated
2 radishes, thinly sliced
1 sheet of roasted seaweed (Nori)
1 tsp roasted sesame seeds
pickled ginger
San J Tamari (g-free soy sauce) for dipping
Spicy Mayo:
3 tbsp mayo
Sriracha (amount depends on preference. I used 1/2 tbsp)
Equipment:
measuring cup
A large glass bowl or a large glass Tupperware container
mandolin or a sharp knife
cutting board
fine grater/zester or microplane
fine-mesh strainer for rinsing rice
measuring cup
wooden spoon
whisk
Instructions:
* * *If you plan to cook your fish or use another protein altogether, then skip steps 1-3 and prepare the rice first * * *
1.Begin by preparing the ceviche. Take your fish out of the freezer and allow it to defrost. If you like your fish medium/rare, then I recommend leaving the fish in the acid bath for about 2 hours. Prefer it well done? Then allow the fish to ‘cook’ in the refrigerator overnight.
2. Into a glass tupperware or glass bowl, zest one lime. Then juice your lemon and limes, San J Tamari, add the salt, cayenne and the thinly-sliced red onion. Mix the ingredients well.
3. Cut the salmon into 1/2 inch (or smaller) cubes. The smaller the cubes, the faster the salmon will cure. Add the salmon into the acid bath and combine. Try to cover all of the fish with the acidic liquid. Cover and place the ceviche in the refrigerator for 1 hour and then mix well again. In the meantime, prepare the rice.
4. Prepare the rice by first rinsing it if time allows. Rinse the rice with cold water and then allow it to drain for 30 minutes before cooking. While the rice is cooking (follow manufacturer’s instructions), whisk the rice vinegar, salt and sugar together and pour it over the rice once it has cooled down a bit. Gently fold the rice with a large wooden spoon a few times to evenly distribute the vinegar mixture. The rice can be covered with a clean kitchen cloth and kept on the counter until you are ready to serve it.
5. While waiting for the rice to cool to room temperature, prepare your bowl toppings. Cook the edamame for a few minutes (I usually steam it for 3-4 minutes in the microwave). Grate the carrot, cut up the seaweed sheets (Nori) into small bite-sized pieces, and prepare your spicy mayo. All these ingredients can be prepared ahead of time and stored in the fridge until you are ready to eat. I recommend waiting to slice the cucumber and avocado until you are ready to serve the meal.
6. Once your ceviche or alternative protein is ready, arrange all desired ingredients on top of the rice. Discard any of the left over ‘acid’ liquid. Garnish the toppings with sesame seeds and enjoy!
Milk & Marigolds © Copyright 2015